
Kegs and CO2 have always been an idea in my mind, but I never decided to venture into this world. I was happy with the classic methods: 22 liters batch in a flat plastic fermenter, siphoning in a plastic bucket, priming directly into the bucket and then bottling with a bottling pipe. Simple and cheap, I saw no reason to switch to other more expensive and complicated techniques.
But as every homebrewer knows, as much as one can resist the curiosity and the desire to experiment, sooner or later will give way. And this in homebrewing reflects into a lot of time to invest and often even money. But isn’t this the essence of a passion?
And here I am, confessing that I succumbed to the temptation to move towards the kegs and CO2 side. The reason is as simple as obvious: increase the quality of the final product. Compared to how I have worked so far, a production upgrade of this type would lead to multiple advantages:
- avoid altering the taste of the beer due to an unforeseen but inevitable bottle refermentation;
- obtain a much cleaner beer;
- eliminate the sediments in the bottle that can bother to someone;
- improve flavors and aromas by minimizing oxidation;
- greatly increase the life of the product by minimizing oxidation;
The bad side of this upgrade is a certain investment in equipment and research and learning time, but as already mentioned, this is part of the game and of the passion. In any case I decided on a step-by-step approach, buying only what is necessary and trying to adapt and self-build as much equipment as possible for a first experimentation phase, and only if satisified i’ll complete the system.
For anyone who wants to jump into this world, I want just tell that in addition to homebrewer friends and various blogs, most of the know-how I learned from the book Fare la birra in casa written by Antonelli and Ruggiero: in my opinion the perfect operating manual that every homebrewer should have and that I highly recommend you to buy (it is in italian language, I leave you a link).
The idea
The basic idea of tyhe first step was to maintain the current fermentation technique by adding keg forced carbonation using a CO2 tank. In a first moment, the fermentation will be done into a plastic fermenter that only later will be replaced by a steel one.
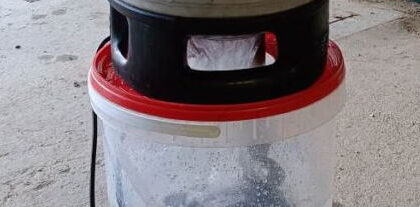
The main problem of this type of transfer with this type of fermenter was to avoid the transfer of fermentation sediments due to the draft from the tap on the bottom. As workaround, the best solution seemed to me to be using a floating sphere as present in common isobaric fermenters that allow you to suck the beer from the top rather than from the bottom of the fermenter.
Now the last unknown factor regarding the bottling: there are several home solutions on the market for bottling in the absence of oxygen (iTap, Ardpressure, etc.) but as I wanted to proceed step-by-step i decided for a common beergun that allows me to saturate the bottles with CO2 before filling them.
To make my idea as clear as possible, I have prepared a small diagram that shows the main four stages of the process.

Phase 1: Fermentation
As I said, for the moment I wanted to keep the current fermentation technique and the current equipment. The starting point would therefore have been the old cheap 28 liter flat plastic Mr.Malt fermenter to which I intended to apply some modifications.
Apart from that project, comparing with other homebrewer we have found over the years that the bubbler or the classic tube with water jar brings to many problems during the cold crash. In this phase, in fact, negative pressure is created in the fermenter, which involves an “extraction” from the outside. In the case of the bubbler this will bring air – and oxygen – inside the fermenter in the same way that it releases CO2, while if you use the tube this will begin to suck liquid from the jar: if it reaches the fermenter it would certainly not be the best situation. In this second case I think the problem is however manageable using a long tube to prevent the liquid from reaching the fermenter. The change I had in my mind actually also considers this problem.
First I wanted to replace gasket and tubes with John Guest fittings in order to ensure airtight closures, easy disassembly and standard connections. So I was going to apply a bulkhead connector in which I would directly insert a John Guest tube to take to the water jar. This already solved the cold-crash problem, as it was enough to connect the tube to the slightly open CO2 tank and the fermenter would suck CO2 instead of liquid or oxygen.
The second argument was the application of the sphere: its tube was not John Guest compatible, so a little inventiveness was required, also because on the various webshops the tube size was not declared. Initially, as made from silicone, I thought that if no other solution I would force it onto a piece of John Guest tube. But since I had a John Guest plug, the solution was to cut it at the ends and turn it into a rigid piece of tube on which to apply, again by force, the silicone tube. The rest of the assembly was similar as before with the application of the bulkhead connector.
On both lines I wanted to apply valves. The one applied to the sphere would have been closed during all fermentation to be opened only during keg transfer. The other valve was used to close the line when moving from the water jar to the CO2 tank before the Cold Crash.
For space reasons I decided to go out from fermenter with 90 degree elbows. Being all fittings standard John Guest, that was very simple. I’ll show you a diagram of the changes to the fermenter lid.

Phase 2: Keg transfer
The idea of this phase was to take advantage of the CO2 tank to fermenter connection used during the cold crash phase to push the beer through the sphere line into the keg. There was not much to invent, it would have been enough to purchase the correct connectors for the keg. Also, having decided to use John Guest stuff, finding all the correct fittings would have been easy and quick.
To know the amount of beer in the keg I would have used a simple scale as recommended in any book or blog, considering that a liter of beer weighs about 1 kg.
Phase 3: Carbonation
 Finally it was in this phase that would be done the magic that would have allowed me to completely eliminate the priming phase, the consequent oxidation, the sediments in the bottle and the organoleptic alteration due to the refermentation.
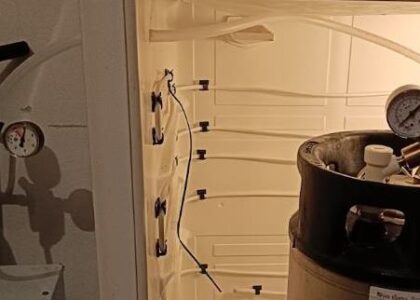
No DIY here, I strictly followed what explained in the book Fare la birra in casa: Connect the CO2 tank to the keg and apply a precise pressure according to temperature and desired carbonation. The book has a very practical table that leaves no doubt about it.
Following the advice of a friend I decided to make a small extra charge by buying a pressure gauge to be applied directly to the keg to have an accurate pressure reading. According to him, applying precise pressures with only the tank pressure gauge could be a bit tricky, especially before being an expert.
Phase 4: Bottling
And so we get to the final part. As I already anticipated, to bottle the beer I want use a beergun. I decided not to take the wonderful Blichmann one but to move on the Chinese version. Here again I couldn’t find any information about the tube sizes, but in the end I managed to find out that the gas connector is good for the John guest 9.5mm tubes, while the beer tube was “around 6mm”: I decided to take a John Guest reducer, and in case it didn’t go well, I would have tried to fix some tubes directly with a clamp.
As procedure I would follow the classic advice, saturate the bottle with CO2 and then fill it up by pulling out the gun as the bottle fills up hoping it will create that little foam that will fill the neck of the bottle.
Shopping list
All I had to do was gather the material I already had and buy what was necessary. Before I went shopping, I thought of a list of materials needed to build the whole system.
For the fermenter I would have needed:
- 2X 1/2″/9,5mm John Guest bulkhead connectors
- 4X 1/2″ gaskets
- 2x 9,5mm John Guest male-female elbows
- 2x 9,5mm John Guest valves
- 9.5mm John Guest plug
- Floating sphere with tube
- Cheap flat plastic fermenter
For keg connections:
- Couple of Beer/Gas Jolly connections with 7/16″ thread
- 2x John Guest 7/16″ thread to 9.5mm fitting
- At least one 18 liter Cornelius keg
For bottling:
- 9.5mm to 6.35mm John guest adapter
- Chinese beergun
- John Guest 9,5mm splitter
And for CO2:
- CO2 tank
- Pressure reducing valve
- John Guest 7/16″ thread to 9.5mm fitting
In addition, several meters of 9.5mm John Guest tube.
To be continued…
That’s all for now, I will continue in the next post where I will tell you about purchase, assembly, testing and use.
Leave a comment